Chapter 6. Word Editing Guidelines
6.1 Principle of content and style separation
6.1.1 What is web page content and layout separation?
The actual contents of a web page, such as text, images, tables, etc., is called “contents”. In addition, the “layout” is to specify the layout of the block, the margin around the block, whether to surround it with a border, its color, the font to be displayed, the size of the characters and other appearances.
When creating a web page, the contents are marked up with the corresponding tags in HTML and the layout is specified by CSS. In latest HTML, the basic principle is to separate content from layout.
6.1.2 Word is a mixture of content and layout
On the other hand, when editing a document in Word, the text format and image layout are specified directly on the text or image while editing on the screen. Word takes a method called "WYSIWYG" that follows the layout on the screen when the document is printed, and the way of thinking about the document layout is fundamentally different from HTML.
This makes it very difficult to create a web page from a document created in Word. In Microsoft Word, if you select "Web Page" as the file type to save in "Save As" of "File" on the ribbon, you can save it in a Web format that can be displayed in a browser at first glance. Unfortunately, the web page format saved in Word is completely useless as it is.
The reason for this is that Word attempts to reproduce the layout including appearance and placement for printing specified on the screen during editing on the web page.
6.1.3 This product ignores Word layout specification in principle
In order to solve these problems, this product discards all layout specifications of documents created in Word and expresses the contents with pure HTML tags.
To master this product, you will need to first understand this basic.
As a general premise, you don't write HTML tags directly in Word, but understanding HTML tags is essential for the result of conversion from a Word document to be proper HTML. Then, you need to edit the Word document, keeping in mind that the Word styling you are currently editing will be converted to what HTML tags.
From this perspective, this chapter describes what you should be aware of when editing a Word document.
6.1.4 Things to avoid when creating Word documents
Avoid the following editing operations on the Word editing screen:
- Adjust the start position of the line with a space character.
- Start a new line in the middle of the line where the sentence continues.
For example, suppose you want to edit a bulleted item that spans two lines by entering a line break at the end of the first line and inserting a space at the beginning of the second line to align the beginning of the line. In this case, even if there is no problem when printing on paper or converting to PDF, but the connection of sentences will be broken when converting to HTML.
6.2 Output the HTML heading rank tag
HTML heading rank tags (h1 to h6) are tags for representing headings. From the SEO point of view, it is sometimes explained that the h1 tag that represents heading rank 1 usually represents the heading as the entire title only once at the beginning of the document. In that case, use "Heading 1" (converted to h1 tag) only once at the beginning of the Word document.
However, as HTML, there is no problem even if the h1 tag appears multiple times in the document. When creating such HTML, you can specify "Heading 1" as many times as you like.
In this product, sections are hierarchized according to the rank of the heading rank tag. When using h1 as a large heading, h2 as a middle heading, and h3 as a subheading, specify that heading 1, heading 2 and heading 3 appear in this order in a Word document. You can repeat heading 2 under heading 1 and heading 3 under heading 2.
6.2.1 Set the Word heading style
When adding headings in Word, apply the "Heading Style" built into Word. Word's "Heading Style" is available from Heading 1 to Heading 9.
The Word2HTML converter associates HTML heading rank tag h1 with heading style 1. Set heading rank tags h2 to h6 for heading styles 2 to 6.
|
Notice |
|
Depending on the theme of Word, the outline level (described later) may not be set in the heading style. When you use such a heading style in a Word document, setting the heading style does not set a heading rank tag for that paragraph. |
You can determine if a paragraph has an outline level by hovering the cursor over the paragraph. Paragraphs with an outline level will have 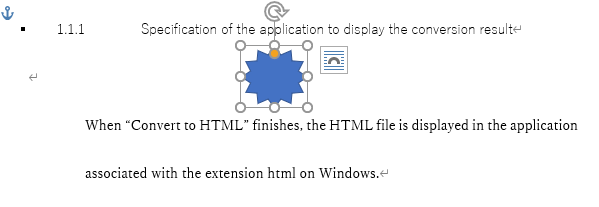 mark on the left side of the paragraph when you hover over the cursor.
6.2.2 Set the title
One of Word's built-in styles is "Title". The title style may have the setting of "Outline Level 1". If you apply such a title style to a paragraph in a Word document, the Word2HTML converter will set the h1 tag on that paragraph.
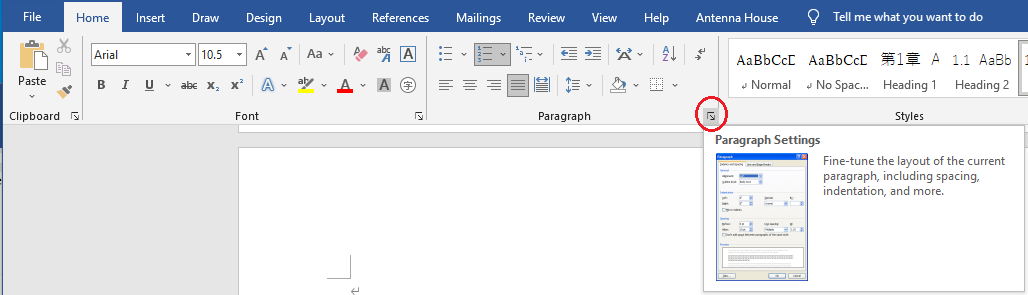
6.2.3 Set the paragraph outline level in Word
Word has a feature called Paragraph Outline Level, which allows you to set paragraphs in 9 levels. Paragraph Outline Level is set in the “Paragraph” dialog of the “Paragraph” group on the “Home” tab of the ribbon.
The “Paragraph” dialog is displayed by clicking the arrow mark at the bottom right of the paragraph group.
The Word2HTML converter maps outline levels 1 to 6 to HTML heading rank tags h1 to h6. In other words, a paragraph for which outline level 1 is set in Word will have HTML heading rank 1 (h1).
6.3 Bullets and Numbering
6.3.1 Bullets
”Bullets” in the “Home” tab on the Word ribbon creates paragraphs with symbols at the beginning of the line.
In Word, the Bullet Library allows you to change the look of the bullets.
Many of these bullets are displayed using a special Word font and may not be displayed correctly in HTML. For this reason, the Word2HTML converter removes the bullets and then converts them to HTML unordered bullets. In HTML, use CSS to set bullets.
Note that blocks with bullets specified in Word look like HTML unordered bullets. However, inside Word, each item is formatted as a paragraph with a bullet. The Word2HTML converter analyzes the parts where "bullets" are set when editing Word and converts them to HTML unordered bullets. Depending on how you specify the paragraph format, bullets may not be converted to HTML unordered bullets. In this case, try changing the paragraph format.
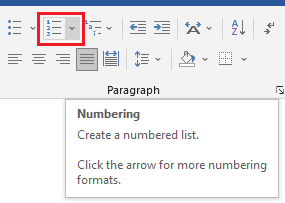
6.3.2 Numbering
"Numbering" in the “Home” tab on the Word ribbon is a function that automatically numbers the beginning of a paragraph in the selected numbering format.

Blocks with numbering look like HTML ordered bullets.
However, Word does not have a style of numbering bullets. Paragraphs with Word numbering are saved as paragraphs with numbers at the beginning of each paragraph item.
The Word2HTML converter programmatically determines whether to convert the specified "numbering paragraphs" to ordered bullets in HTML or numbering paragraphs. The judgment criteria are as follows:
- When consecutive two paragraphs with numbering are set in a Word document, the ordered bullets are set.
- When a single paragraph with numbering is set in a Word document, the number is converted to the normal character at the beginning of the paragraph.
This judgement may not always work, so if it doesn't work as expected, try editing the paragraph in Word.
6.4 Layout of shapes
The option to layout a figure in Word (Layout Options) can be selected by right-clicking the target figure to display options (see the following figure).
6.4.1 In line with text
“In line with text” is to layout an image between characters as if it were single character, and the position moves together with the characters before and after. The image with “In line with text” specified is placed between characters like ( ) in HTML.
As a result of converting to HTML, the attribute of class=”inline” is set in the img tag.
6.4.2 With text wrapping
Images with “With text wrapping” specified will have an anchor mark when edited in Word.
A. Images with anchor marks in headings and paragraphs are output just after the end tag of headings and paragraphs, and the attribute of class=”block” is set in the img tag.
In the following example, the image anchor mark is at the beginning of the heading.
Converting this to HTML will output an img tag between the end tag of the heading rank and the start tag of the next paragraph, as shown below.
<section>
<h3>1.1.1 Specification of the application to display the conversion result</h3>
<img class=”block top-bottom” src=”./images/graphic1.svg” alt=”Please enter alt text.”>
<p>When “Convert to HTML” finishes, the HTML file is displayed in the application associated with the extension html on Windows.</p>
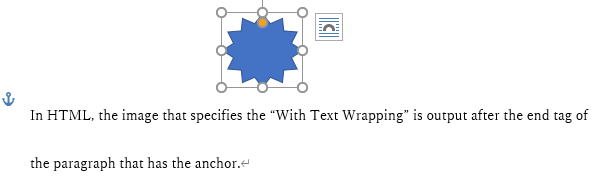
In the following example, the image anchor mark is at the beginning of the paragraph.
Converting this to HTML will output an img tag just after the end tag of the paragraph, as shown below.
<p>In HTML, the image that specifies the “With Text Wrapping” is output after the end tag of the paragraph that has the anchor.</p>
<img class=”block top-bottom” src=”./images/graphic2.svg” alt=”Please enter alt text.”>
In this example, even though the paragraph text is at the back of the figure on the Word display, when converted to HTML, the img tag is output after the paragraph. Word places images on paper, so if an image doesn't fit well on one page, it may be placed on the next page. Even in such a case, when converting to an HTML file, the img tag will be placed after the paragraph with the anchor mark.
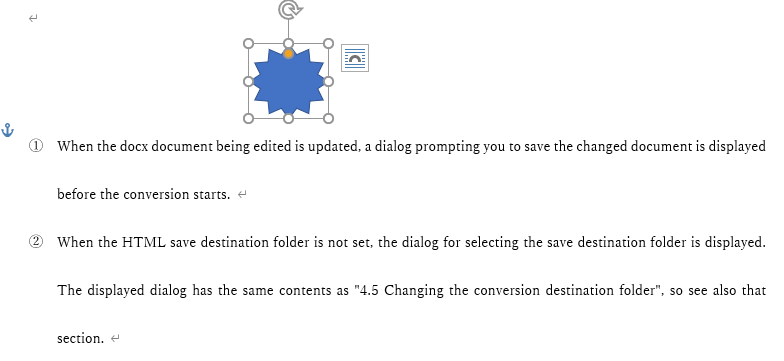
B. For images with an anchor mark on a bulleted item, the img tag is output just before the end tag of the bulleted item.
In the following example, the image anchor mark is at the beginning of the first item in the bulleted list.
Converting this to HTML will output the img tag just before the end tag of the first bulleted item, as shown below. (This is because if you put an img tag after the end tag of a bulleted item and between the start tag of the next bulleted item, an HTML syntax error will occur.)
<ol>
<li>When the docx document being edited is updated, a dialog prompting you to save the changed document is displayed before the conversion starts.<img class=”block top-bottom” src=”./images/graphic3.svg” alt=”Please enter alt text.”>
</li>
<li>When the HTNL save destination folder is not set, the dialog for selecting the sabe destination folder is displayed. The displayed dialog has the same contents as “<a href=”_Ref85635186”>4.5</a>Changing the conversion destination folder”, so see also that section.</li>
</ol>
6.5 Blank lines and spaces in Word
The default conversion of “HTML on Word” ignores blank lines (lines with only line breaks at the beginning of lines) and page breaks in Word documents. Also, Word expects to print on paper, so if a figure or table does not fit on the page, it will be sent to the next page, leaving a large space. These spaces are ignored when converting to HTML.
You don’t need to worry about the spaces and blank lines that will be created on the layout on the Word edit screen.
6.6 Grouping of shapes and pictures
In Word, you can place shapes and images on paper. If you want to combine these shapes and images into one in HTML, group them in Word.
If you just place multiple figures in the same position on the screen of the Word document you are editing, the figures will be disjointed when converted to HTML.
6.7 Reference links
There are two ways to set a reference link in Word: "Link" and "Cross-reference" in the ribbon "Insert".
6.7.1 Link
You can set an external URL or a link to the inside of Word in "Link" on the "Insert" tab on the Word ribbon.

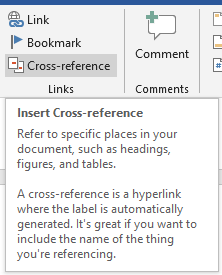
6.7.2 Cross-reference
“Cross-references” on the “Insert” tab on the Word ribbon allow you to set links to headings, diagrams, tables, and paragraphs with numbering inside Word.

6.7.3 Link reference
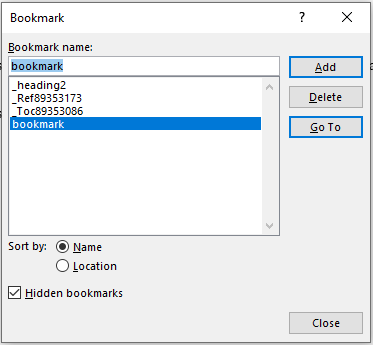
Links can be referenced to external URLs or bookmarks inside the document. Bookmarks can be added, deleted, etc. in the “Bookmark” on the "Insert" tab of the Word ribbon. The following is an example of a bookmark.
Four bookmarks are displayed in the above dialog, and the bookmark types are as follows.
- Items in the table of contents created by automatic generation on Word are bookmarks starting with "_Toc".
- References set in “Cross-reference” start with "_Ref" bookmarks.
- "_heading 2" at the reference of the document internal link.
- "bookmark" is the bookmark added in the bookmark dialog
When converted to HTML, the bookmark will be converted to <span id=”bookmark name”></span>.
|
[Example] A bookmark named “here” is set here. |
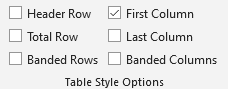
6.8 Tables
Converts a table created by the table function of Word to an HTML table tag. The background color, border thickness, color, style (only some styles are supported), and table width specified for table cells can be output as style attributes of each HTML tag by specifying the "-tablestyle" parameter in the conversion options.
Alternatively, each tag in the table can be decorated with CSS styles.
Also, by naming and applying table styles, you can output the name of the table as the value of the <table> tag's class attribute, so you can decorate the table with the respective CSS style for different types of tables.
|
Tip |
|
To specify decorations for table-related tags, define the style of the corresponding tag in the CSS file to be loaded. |
6.9 Character decoration and fonts
Of the features that can be set in the "Home" font group on the Word ribbon, “Bold”, “Superscript” and “Subscript” are converted to the <strong>, <sup> and <sub> HTML tags.
Italics, underlines, strikethrough and text color can be output by specifying the respective parameters in the conversion options. (See "3.2 Conversion options")
* If the font displayed by the Web browser does not have italics, the text will not be displayed in italics.
Other font names and character sizes are ignored during conversion.
6.10 Creating an index
In the “Index” section of the “References” tab of the Word ribbon, you can register index entry and create an index.

Select the text you wish to register in the index and click the “Mark Entry” button above.

Edit as necessary in the Mark Index Entry screen and click the “Mark” button.

State displaying the text part of the marked index.
Move the cursor to the place where you want to create an index and click the “Insert Index” button.
After setting the desired layout on the “Index” screen and clicking the “OK” button, Word will automatically create a list of indexes.

Now that the index has been created, using this product to convert it to HTML in this state will convert the index references to hyperlinks.

*Index hyperlinks are output as default. Parameters do not need to be specified.
*Only indexes registered with “Mark Entry” in the “Reference” of the Word ribbon are supported.
*If XE (Index Entry) fields registered in Mark Entry are changed manually, or XE and INDEX fields are inserted using the field function, they may not be output as displayed in Word or may not be output correctly.
*The settings made in the "Options" and "Page number format" items of the "Mark Entry" screen will not be reflected in the output HTML index. (Page numbers will not be output.)